
An epilator requires regular cleaning. A tool that’s clogged with dirt, oil or other debris won’t work as effectively. Also, you’ll risk transferring bacteria from the device to your skin.
Instead of fighting with a dirty epilator, learn to clean yours quickly and thoroughly. With the correct care, you can keep your epilator in great shape so that it’s always ready to tackle a hair-removal job.
1. Cut the power.
Before beginning any cleaning processes, turn off your epilator. If yours is the type that plugs into the wall, unplug it.
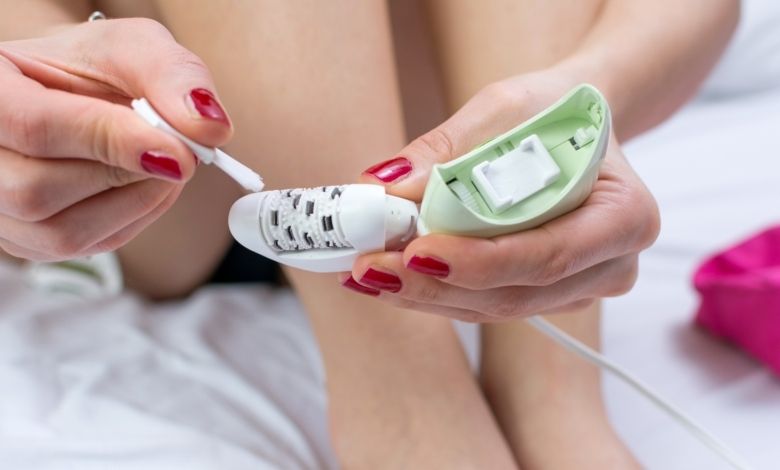
2. Take off the head.
Pop the head off of the machine. There may be a release button that you press to release it. If there are attachments, take them off, too.
3. Brush away loose hairs.
Use a small, soft brush to dust bits of hair away from the epilator head. You can also use the brush inside the base of the epilator to get any hairs that may have fallen underneath the head. Do this over the sink or a dustbin so that you won’t end up with little scraps of hair all over your room.
Many epilators come with tiny cleaning brushes. They’re made specifically for this job. If yours doesn’t have one, try a small paintbrush instead. Alternatively, you can use a hair dryer’s low setting to try blowing the hair away.
4. Wash the pieces.
You may be able to rinse the head and the other attachments under clear running water. This will help dislodge loose hairs and other debris that the brush missed.
Use hot water and a bit of friction against the palm of your hand to help with this. Be sure to rotate the tweezer wheel as you wash it so that you won’t miss any of its sides.
The electric portions of your epilator should never be rinsed or submerged in water. In fact, it’s a good idea to consult your owner’s manual before using water on any parts of the device. If getting the pieces wet is discouraged, stick to spot-cleaning methods instead.
5. Disinfect the tweezers.
Once you’ve gotten rid of the visible debris, it’s time to address the germs that may be lingering.
One option is to fill a drinking glass with warm water. Add a squirt of dish soap that boasts antibacterial properties. Put the head and other water-safe pieces in the glass to soak for up to half an hour.
Another option is to use a cotton ball or a small cleaning rag that’s been dampened with rubbing alcohol. Rub this over the portions of the epilator that come in contact with your skin.
You may actually want to use both of these methods. First, soak the pieces in dish soap. Once they’re dry, give them an alcohol swipe.
It’s also a good idea to disinfect the cap that covers your epilator’s head. Otherwise, the head and the cap may pass bacteria back and forth.
6. Dry the pieces.
It’s important to make sure that the pieces are thoroughly dry before you reassemble them. This could take anywhere from a few hours to a few days.
After gently patting the pieces with a towel, spread them out on a dry towel. If possible, lay the towel in a sunny spot in hopes that the rays will speed up the drying process.
7. Reassemble the pieces.
Once your unit is totally dry, put it back together. You’ll have an epilator that is clean, sanitary and ready for its next use!
8. Repeat regularly.
To keep your ultimate epilator in great shape, repeat these steps each time that you use it. Keeping your epilator clean will protect your skin and help the unit work better.